Installation:Setup
From WiRNS Wiki
(Difference between revisions)
| Line 1: | Line 1: | ||
| − | |||
| − | |||
| − | |||
| − | |||
| − | |||
| − | |||
| − | |||
| − | |||
=== Open the Guide Data Configuration Screen === | === Open the Guide Data Configuration Screen === | ||
| − | * | + | *Right-Click on the [Service_Monitor:Introduction|WiRNS Service Monitor] icon [[image:setup_mon.png]] in the System Tray to display the context menu. Select '''Configuration->Schedules Direct'''. If the Service Monitor is not running, in your web browser go to http://127.0.0.1:8923/manage/ConfigureDataDirect<br> |
| − | + | *'''If the WiRNS Page fails to load:''' | |
| − | + | **You have entered an incorrect URL, or | |
| + | **WiRNS is not running or failed to completely start. Troubleshooting is required.<br><br> | ||
=== Configure Schedules Direct as your Guide Data Source === | === Configure Schedules Direct as your Guide Data Source === | ||
| + | [[image:setup_guidedata.png|843px]]<br><br> | ||
*If you have not already done so, go to [https://www.schedulesdirect.org/signup/ Schedules Direct Signup] and sign up for the FREE 7 day trial. Only pay after you get this working.<br> | *If you have not already done so, go to [https://www.schedulesdirect.org/signup/ Schedules Direct Signup] and sign up for the FREE 7 day trial. Only pay after you get this working.<br> | ||
*Enter your Schedules Direct Login Name ('''Login 1''') and Schedules Direct Password ('''Password 1''') | *Enter your Schedules Direct Login Name ('''Login 1''') and Schedules Direct Password ('''Password 1''') | ||
| Line 24: | Line 18: | ||
These steps are for the 4000 and 5000 level ReplayTV Models | These steps are for the 4000 and 5000 level ReplayTV Models | ||
*On each of your your ReplayTV units, go to '''Menu''', '''Setup''', '''Network and Input Settings''', '''Change Network''' | *On each of your your ReplayTV units, go to '''Menu''', '''Setup''', '''Network and Input Settings''', '''Change Network''' | ||
| + | *If your Replay is set to automatically get its network settings, you must change this to Manual. Otherwise, select '''Change Manual Settings''' | ||
**Configure your ReplayTV to use a static IP address. For assistance, please read [http://compnetworking.about.com/od/workingwithipaddresses/qt/staticipaddress.htm Using Static IP Addresses on Private Networks] | **Configure your ReplayTV to use a static IP address. For assistance, please read [http://compnetworking.about.com/od/workingwithipaddresses/qt/staticipaddress.htm Using Static IP Addresses on Private Networks] | ||
**Set Netmask to 255.255.255.0 | **Set Netmask to 255.255.255.0 | ||
| Line 29: | Line 24: | ||
**Set DNS Server 1 to your WiRNS IP address | **Set DNS Server 1 to your WiRNS IP address | ||
**Set DNS Server 2 to your WiRNS IP address | **Set DNS Server 2 to your WiRNS IP address | ||
| + | *[[image:setup_network.png]]<br><br> | ||
**Select '''Continue''', your ReplayTV will attempt to verify the network settings. If the settings do not verify, you must correct the problem before continuing. Either you have entered incorrect settings, or WiRNS is not running or able to use port 80, or there is a firewall or other application blocking the communication.<br><br> | **Select '''Continue''', your ReplayTV will attempt to verify the network settings. If the settings do not verify, you must correct the problem before continuing. Either you have entered incorrect settings, or WiRNS is not running or able to use port 80, or there is a firewall or other application blocking the communication.<br><br> | ||
=== Edit your Replay Configurations in WiRNS. === | === Edit your Replay Configurations in WiRNS. === | ||
Revision as of 21:25, 8 July 2011
Contents |
Open the Guide Data Configuration Screen
- Right-Click on the [Service_Monitor:Introduction|WiRNS Service Monitor] icon File:Setup mon.png in the System Tray to display the context menu. Select Configuration->Schedules Direct. If the Service Monitor is not running, in your web browser go to http://127.0.0.1:8923/manage/ConfigureDataDirect
- If the WiRNS Page fails to load:
- You have entered an incorrect URL, or
- WiRNS is not running or failed to completely start. Troubleshooting is required.
Configure Schedules Direct as your Guide Data Source

- If you have not already done so, go to Schedules Direct Signup and sign up for the FREE 7 day trial. Only pay after you get this working.
- Enter your Schedules Direct Login Name (Login 1) and Schedules Direct Password (Password 1)
- Click the Update button
- Note for later reference: If you have more than one lineup, your Replay will choose to 'Offset' one or more, generally by 1000, to prevent channel number conflicts (eg. Channel 123 becomes 1123). Use this screen to indicate to WiRNS which lineup(s) were offset and by how much. WiRNS does not dictate this offset, but should be told what it is.
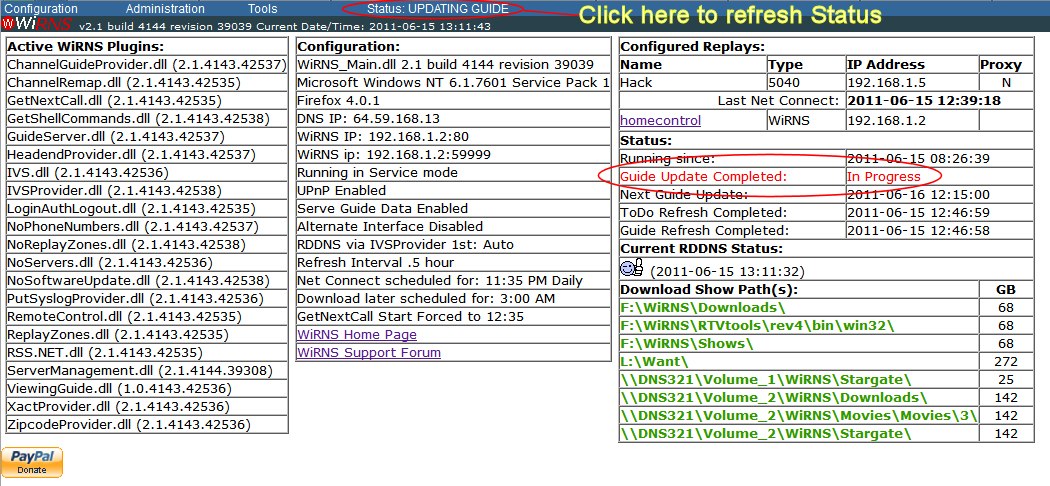
- From the Menu, select Administration->Update Guide
- This will display the WiRNS Index Page which will show you that the Guide Update is In Progress. This process will take several minutes. Click the Status menu item to refresh the page:

Alternate Guide Data Source
It is possible to use XMLTV Guide Data with WiRNS. Please visit this link as a starting point.
Configure your ReplayTV to work with WiRNS
These steps are for the 4000 and 5000 level ReplayTV Models
- On each of your your ReplayTV units, go to Menu, Setup, Network and Input Settings, Change Network
- If your Replay is set to automatically get its network settings, you must change this to Manual. Otherwise, select Change Manual Settings
- Configure your ReplayTV to use a static IP address. For assistance, please read Using Static IP Addresses on Private Networks
- Set Netmask to 255.255.255.0
- The Gateway value should remain unchanged (probably your router IP address)
- Set DNS Server 1 to your WiRNS IP address
- Set DNS Server 2 to your WiRNS IP address
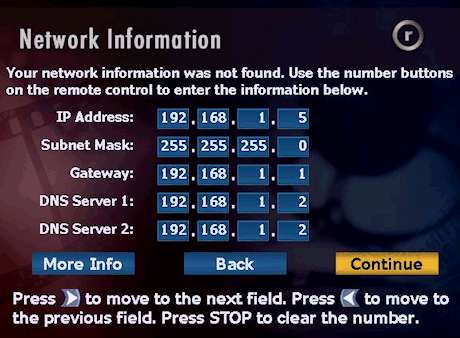
- Select Continue, your ReplayTV will attempt to verify the network settings. If the settings do not verify, you must correct the problem before continuing. Either you have entered incorrect settings, or WiRNS is not running or able to use port 80, or there is a firewall or other application blocking the communication.
- Select Continue, your ReplayTV will attempt to verify the network settings. If the settings do not verify, you must correct the problem before continuing. Either you have entered incorrect settings, or WiRNS is not running or able to use port 80, or there is a firewall or other application blocking the communication.

Edit your Replay Configurations in WiRNS.
From the WiRNS Menu, Select Configuration->Replays
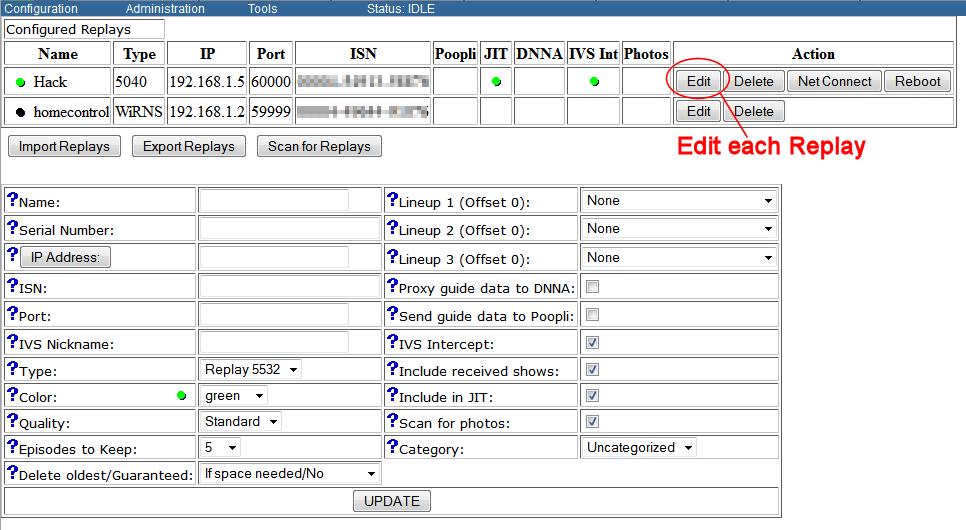
- If, in the previous step, you changed the IP Address of any Replay, Delete those Replays and then Scan for Replays
- If any or all of your Replays are not listed, you can try to Scan for Replays again, or, failing that, add the Replay manually
- For each Replay listed, click the Edit button. (This is not necessary for the WiRNS Replay).
This will display the Edit Replay screen:
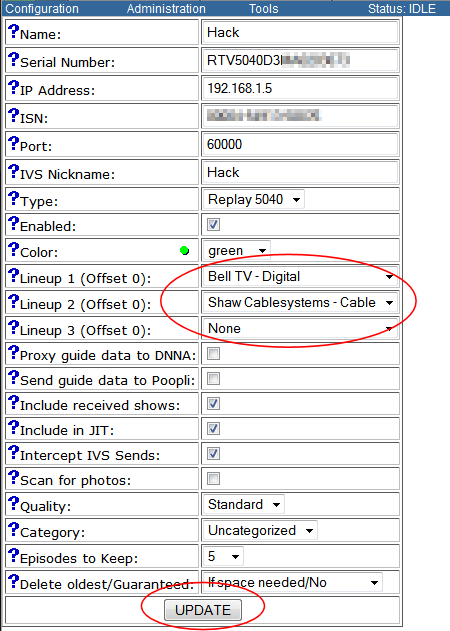
- Using the Lineup dropdowns, select your Lineup(s). Click Update.
- Once you have edited the lineups for all of your Replays, try Tools->Current Channel Guide. You should now have Channel Guide Data in WiRNS.


Configure your ReplayTV lineups
- On each of your your ReplayTV units, go to Menu , Setup , Network and Input Settings, Change Zip Code
- Change your Zip Code to any valid Zip Code in your time zone. This will cause your ReplayTV to connect to WiRNS and download your WiRNS Lineups.
- Once the ReplayTV has completed its update, you will be asked to set up your connections. After selecting the connection type, you will be asked for the service provider. Select your desired lineup - it will have 'WiRNS' in the name
- If this or the previous step failed, change your Zip Code once more and continue
- Complete the Inputs setup
- When you return to the Setup Summary, select Keep all settings