Installation:Router
The Robman (Talk | contribs) (→Configuring your PC for a static IP address) |
The Robman (Talk | contribs) (→Configuring your PC for a static IP address) |
||
| Line 38: | Line 38: | ||
==Configuring your PC for a static IP address== | ==Configuring your PC for a static IP address== | ||
You might also need to configure the PC where WiRNS is running so that it uses the static IP address that you reserved above. Rather than re-invent the wheel, here is an excellent article that walks you through the step by step for a Windows 7 PC: | You might also need to configure the PC where WiRNS is running so that it uses the static IP address that you reserved above. Rather than re-invent the wheel, here is an excellent article that walks you through the step by step for a Windows 7 PC: | ||
| − | <br> | + | <br><br> |
http://www.colorado.edu/oit/tutorial/static-ip-configuration-windows-7 | http://www.colorado.edu/oit/tutorial/static-ip-configuration-windows-7 | ||
| − | <br> | + | <br><br> |
| − | Note: it is not recommended that you set a laptop to use a static IP address as this will not work outside of your home network. | + | Note: it is not recommended that you set a laptop or mobile device to use a static IP address as this will not work outside of your home network. |
| − | + | <br><br> | |
| − | <br><div class="resize">[[image:router-ip5.jpg]]</div><br> | + | <div class="resize">[[image:router-ip5.jpg]]</div><br> |
If you are intending to run DVArchive on the same computer as WiRNS, the next step is to assign a second IP address to the computer which DVArchive can use. To do this, click on the "Advanced" button above, then on the next screen click on the "Add" button in the IP Addresses section, and add the 2nd IP address that you reserved on your router. | If you are intending to run DVArchive on the same computer as WiRNS, the next step is to assign a second IP address to the computer which DVArchive can use. To do this, click on the "Advanced" button above, then on the next screen click on the "Add" button in the IP Addresses section, and add the 2nd IP address that you reserved on your router. | ||
Revision as of 13:04, 20 October 2015
To get WiRNS working properly requires your Replay units, and the computer running WiRNS, to use static IP addresses. This section shows you how to do that. The screens shots are from a D-Link DIR-850L wireless router, but the process should be similar on any router.
Part of the job of a router is to serve up IP addresses for all the devices that connect to it, both wirelessly and via one of the physical ports. The mechanism that does this is called a DHCP Server. Normally, the server will dynamically (ie, randomly) assign IP addresses to each device, but it also provides the ability for you to reserve certain IP addresses for certain devices, and that's what we want to do here.
Contents |
Network Settings
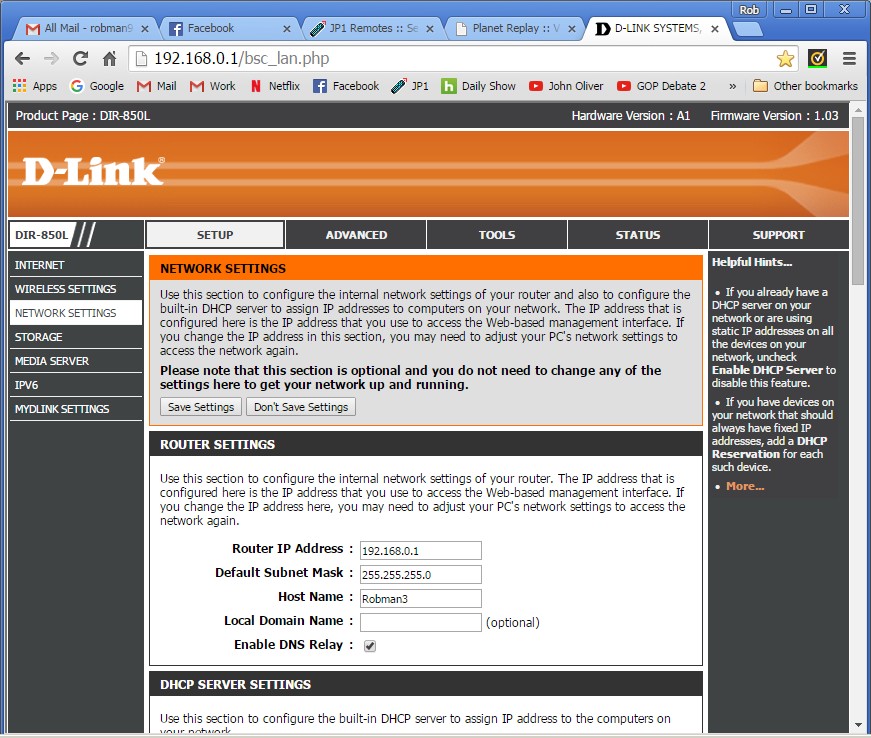
First you need to navigate to the Network Settings panel.
DHCP Server Settings
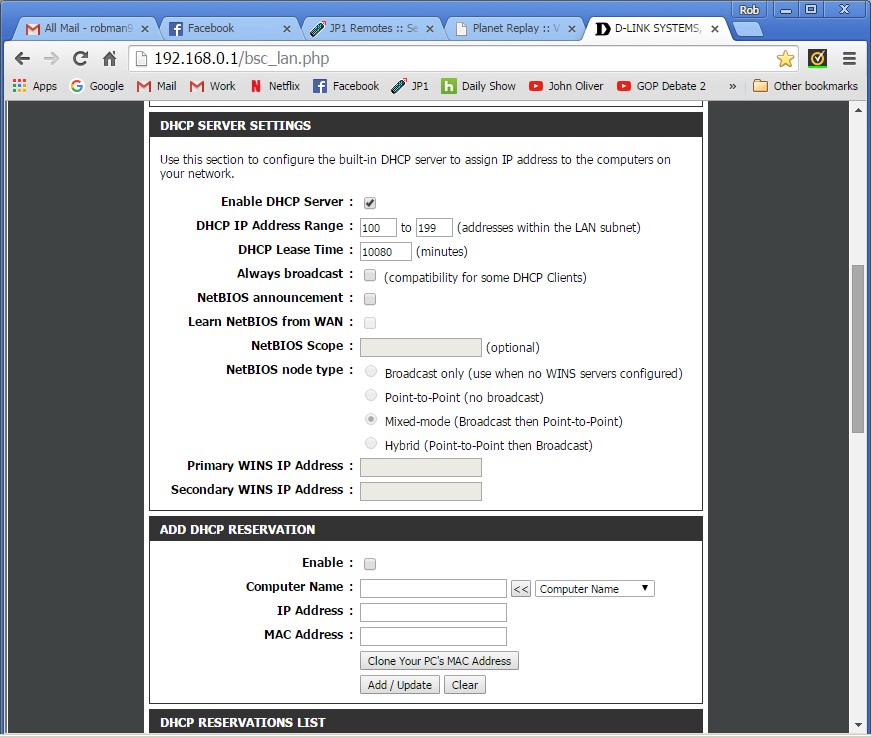
Then you navigate to the DCHP Server Setting panel, which is this case just involves scrolling down. The server will typically have a range of IP addresses that it will use for dynamic assignments, which in this case is 100 thru 199. As the overall address of this router is 192.168.0.1 (from the first screen shot), that means it will offer up IP addresses in the range 192.168.0.100 thru 192.168.0.199 dynamically.
The next step is to reserve IP addresses, outside of the dynamic range, for each of your ReplayTV units and for the computer where you will be running WiRNS. If you intend to run DVArchive from the same PC as WiRNS, reserve two IP addresses for that PC so you can use for WiRNS and the other for DVArchive.
- Enable: Check this
- Computer Name: Give each device a name, so you know what it is.
- IP Address: Chose an address outside of the dynamic range.
- MAC Address: If you are creating an entry for the PC that you are currently using, you can click the "Clone Your PC's MAC Address" button, but if you are creating an entry for a ReplayTV unit, you will need to enter the MAC address for that particular unit.
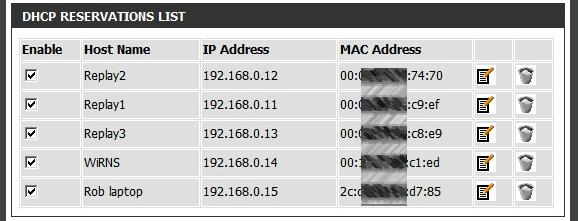
This is the reserved list after setup.
Configuring your ReplayTV for a static IP address
These steps are for the 4000 and 5000 level ReplayTV Models
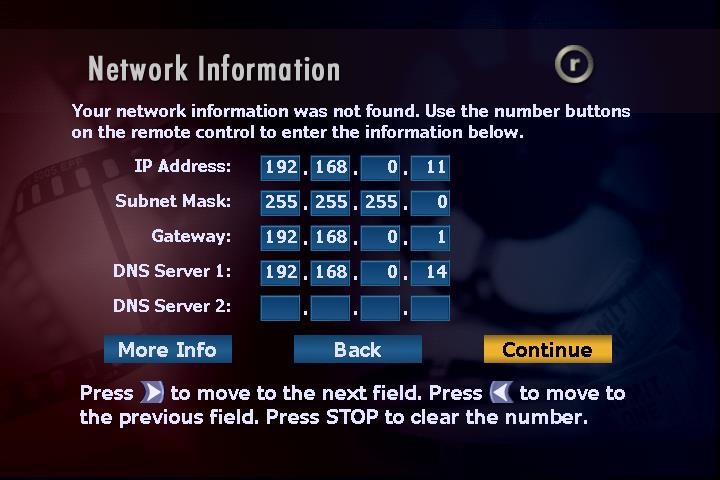
- On each of your your ReplayTV units, go to Menu, Setup, Network and Input Settings, Change Network
- If your Replay is set to automatically get its network settings, you must change this to Manual. Otherwise, select Change Manual Settings
- IP Address: set to the IP address that you reservered above
- Subnet Mask: leave as 255.255.255.0
- Gateway: should be your router address
- DNS Server 1: change to the IP address of the PC running WiRNS
- DNS Server 2: can be blank or the same as DNS1
- Select Continue, your ReplayTV will attempt to verify the network settings. If the settings do not verify, you must correct the problem before continuing. Either you have entered incorrect settings, or WiRNS is not running or able to use port 80, or there is a firewall or other application blocking the communication.
Configuring your PC for a static IP address
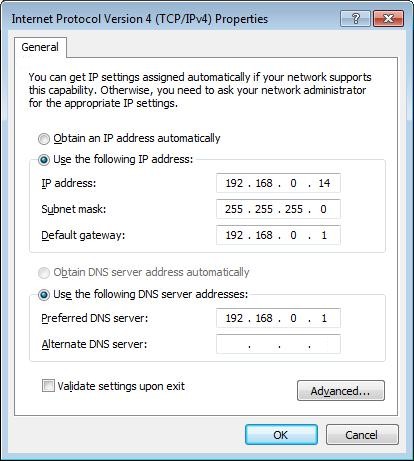
You might also need to configure the PC where WiRNS is running so that it uses the static IP address that you reserved above. Rather than re-invent the wheel, here is an excellent article that walks you through the step by step for a Windows 7 PC:
http://www.colorado.edu/oit/tutorial/static-ip-configuration-windows-7
Note: it is not recommended that you set a laptop or mobile device to use a static IP address as this will not work outside of your home network.
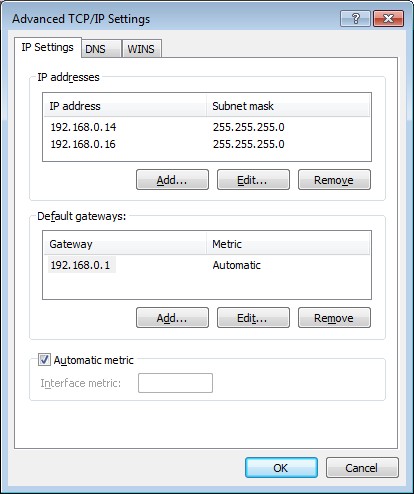
If you are intending to run DVArchive on the same computer as WiRNS, the next step is to assign a second IP address to the computer which DVArchive can use. To do this, click on the "Advanced" button above, then on the next screen click on the "Add" button in the IP Addresses section, and add the 2nd IP address that you reserved on your router.
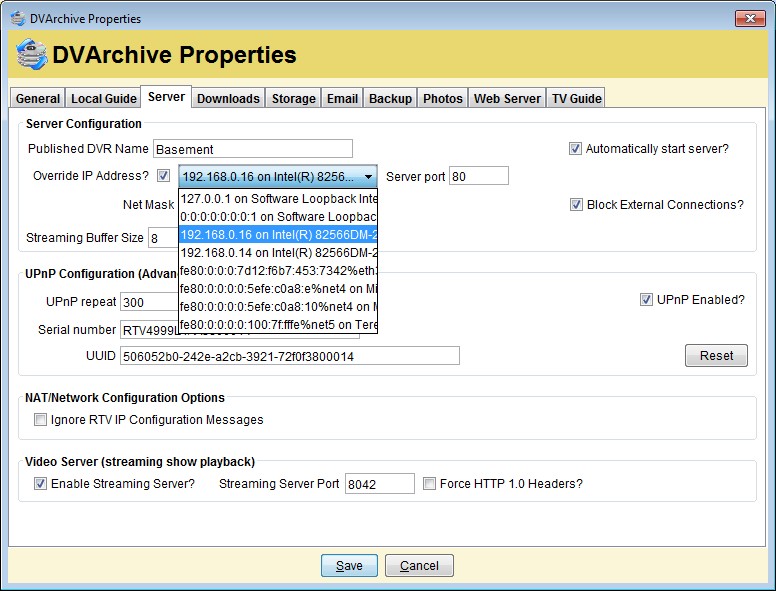
This article isn't really about setting up DVArchive, but none the less, here is how you will set DVArchive to use this new IP address that you just created.
In DVArchive, go to File > DVArchive Properties then select the Server tab. Check "Override IP Address?" and select the new IP address from the drop down menu.
Port Forwarding
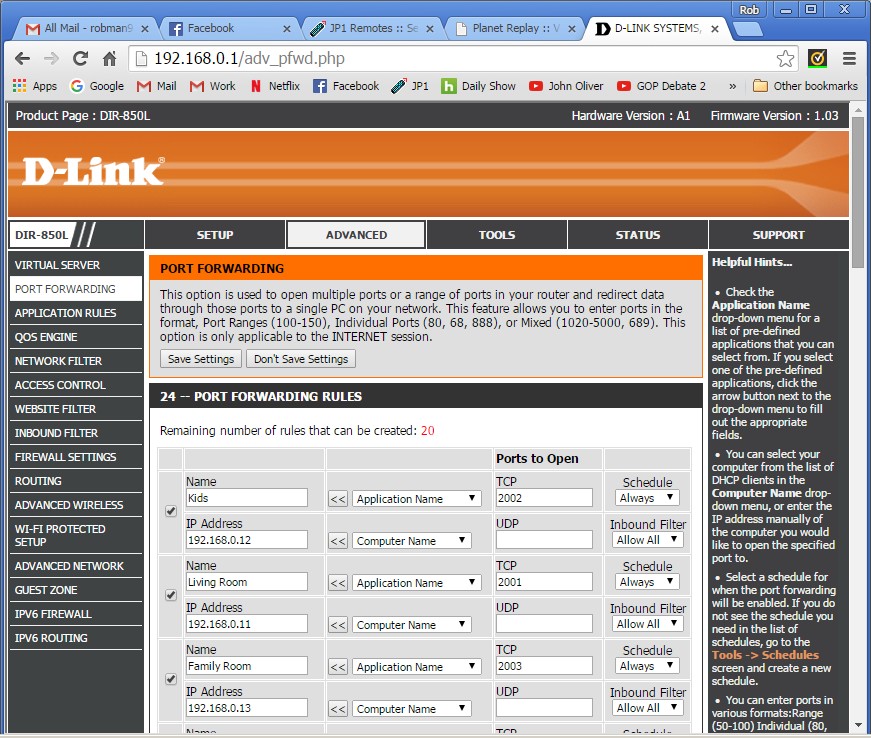
While you are configuring your router, you might as well set up Port forwarding, if you haven't done so already, which will enable the IVS (Internet Video Sharing) feature. To do this, navigate to the Port Forwarding panel found in the Advanced setion. Here you will assign a port to each IP address that you just reserved for your ReplayTV units. The Replay unit itself accepts port numbers in the range 01024 through 65535, but your router may have different limitations. This router allows ports in the range 1024 thru 5000, so for my three Replay units, I used 2001 thru 2003.
